Fluidity and motion are two of the best ways to catch someone’s eye and hold their attention. In PowerPoint, it is necessary that you catch the attention of your users and keep it long enough to teach and test their knowledge. PowerPoint is a powerfully simple tool. The interface is easy to manage and the display easy to look at; and you don’t get scared off by how deep the tool allows you to go. So holding attention in PowerPoint can be somewhat difficult. There are two features in PowerPoint that are there solely to catch and hold the gaze of your users. These features are simply: Animations and Transitions. I will be going through the steps showing you how to integrate these features into your projects to create an amazing eye catching (and holding) presentation.
Animations:
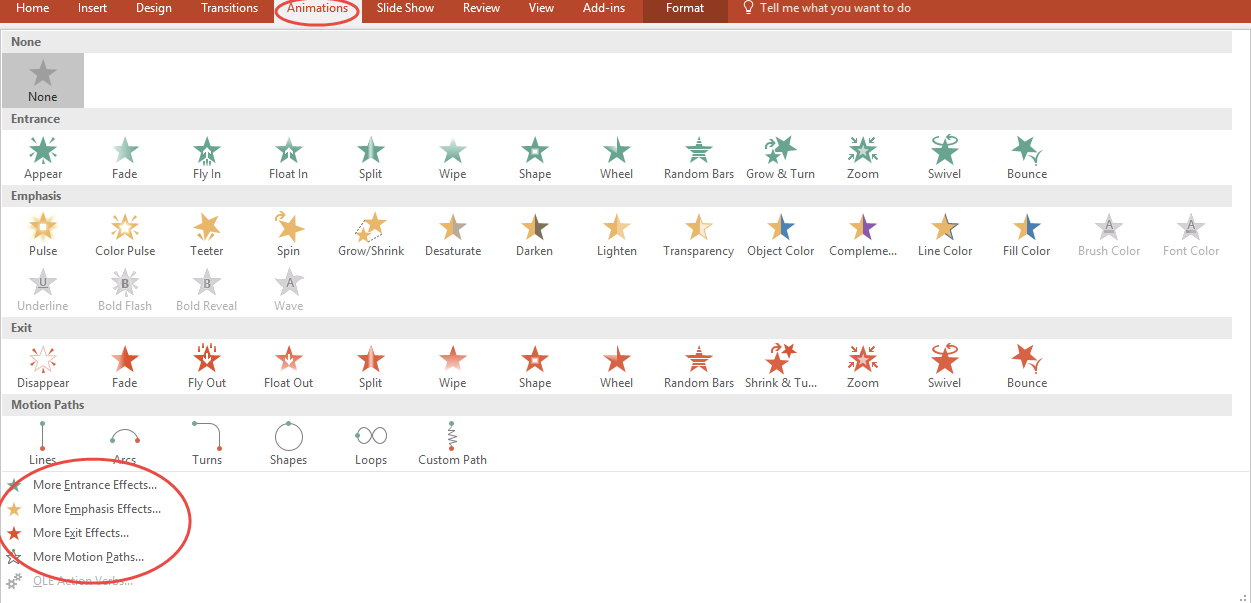
The first step in adding animations to your project is to click on a shape, picture, button (anything really) and click the Animations tab located on the main ribbon. Once that is clicked, you can click on the down arrow to expand your view of the animations available for you to use. And, as you can see, there are three types of animations that you can use in your projects. There are Entrance, Emphasis and Exit animations. Entrance and Exit animations are self explanatory, but Emphasis animations are a little less known and are less often used. Emphasis animations are animations that happen in between the Entrance and Exit animations. This is very helpful for adding “emphasis” to an object, allowing for direction on a slide without having to hold the user’s hand. At the bottom of the drop down panel, you can see that there even more choices for the animations that you want to use. Make sure to look through all of the animations in all three categories to ensure that you are making the best projects and presentations.
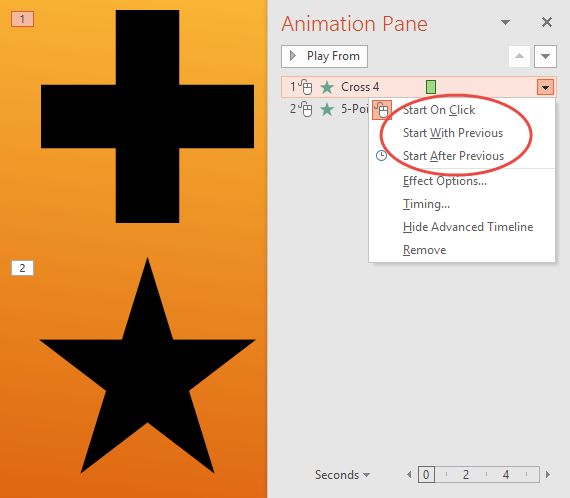
An important aspect of the Animations tab is the Animation Pane. The pane is located to the right of the panel of animations. In this pane, you can choose when the animation happens. So if you have two animations on your screen, you can choose the option that says that they will happen together or if they will happen one after another. There are many more options to play with including the option to change the effects of the animation.
Transitions:
Transitions can be thought of as animations that are applied to how a slide enters and exits the user’s view. To apply a transition, you simply have to click on the slide you want a transition applied to and click the Transitions tab located on the main ribbon. Notice that there is a drop down button (just like the Animations tab) that will display the total amount of transitions available to you. PowerPoint splits up the Transitions into 3 different categories: Subtle, Exciting, and Dynamic Content. All of these are self explanatory but are there for you to easily choose the transition that fits with your presentation.

Another important aspect of this feature that is necessary to know how to use (and know exists) is the Timing panel located to the right of the Transition panel. This area is very important in editing how you want the transition to occur. Here you can change the duration of the transition and when it will happen. You can even add a sound every time the transition takes place. And most importantly, you can add the same transition to every slide easily in this panel.

When these features are applied to your projects and presentations, the attention of your audience will increase dramatically. Our eyes are automatically attracted to motion. It is an almost uncontrollable reaction to look at the moving object in our vision. So to hold the attention of an audience and to in those times of desperation, bring them back, these features are so crutical. Let me know in the comments below how animations and transitions have helped your presentations retain the attention of your audience.
Recent Comments